Featured

Mango-Tapicoa Pearl-Chia Pudding.

Super easy yet very tasty pudding that can be a wonderful wholesome breakfast in the day and can be served as a chilled dessert after sinful indulgence.

The season of mangoes were here and I did quite a few experiments with mangoes, I am going to share a few of my favorites here. Today let me tell you how I ended up making this amazing pudding.

The husband time and again takes a sabbatical from normal food and the intake of diet food supersedes and that is one time when I try my best to make high protein, less white sugar, zero oil food. In a way I do enjoy the indulgence in my kitchen experiments, sometimes it becomes a little frustrating especially for a cook like me who is more of an instinctive cook and counting calories and fat and protein and carbs sometimes takes a toll on me.

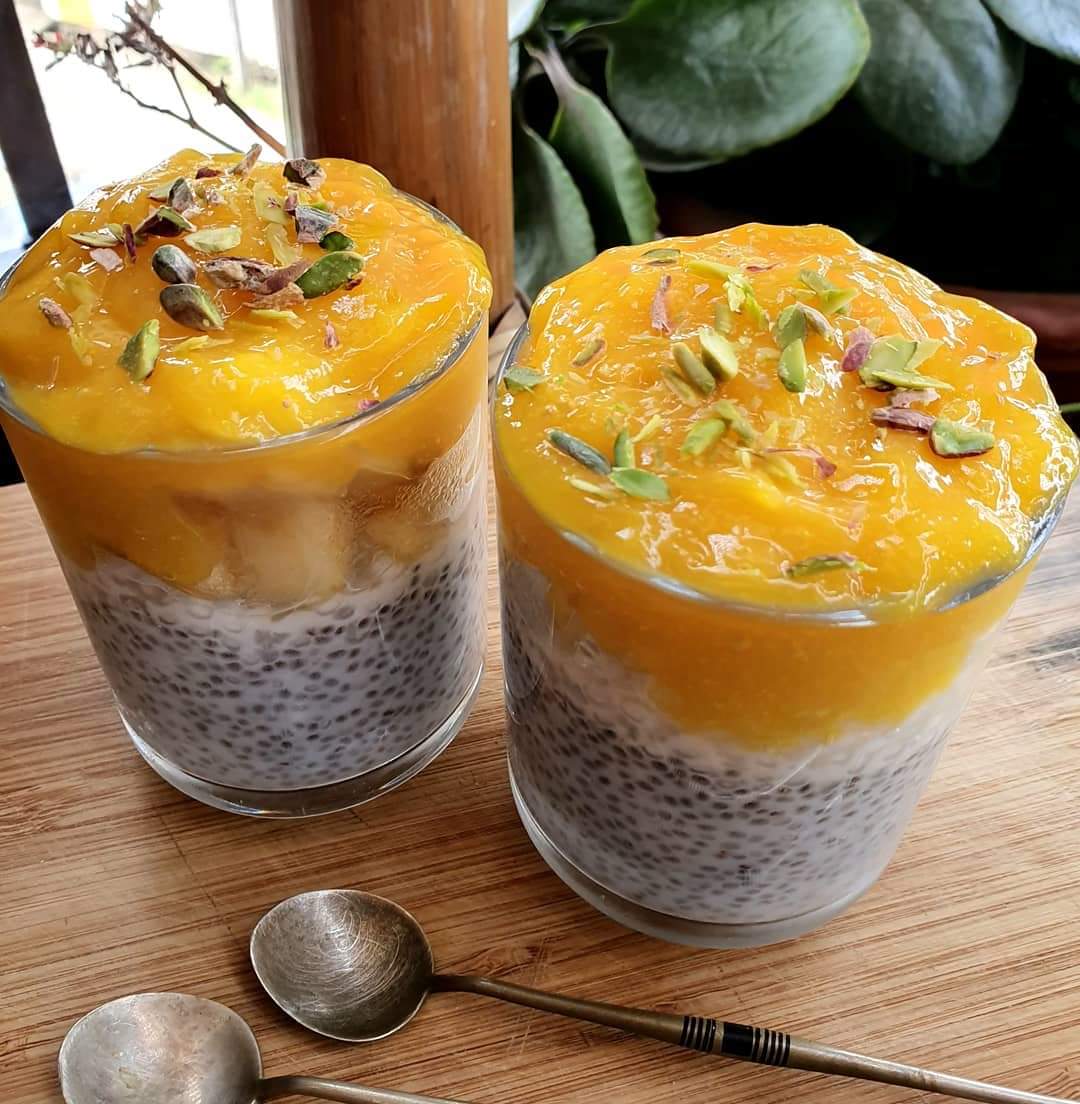
However I do keep trying and that is something that I do with 100% zeal. So when a few diet conscious people came home and were zero tolerant towards white sugar, I decided to fruit it up and here is how the idea of pudding came up.

The Final Layered Lovelies

The idea was to give them something sweet and yet not really crib much about the sweetness, though at times I know a few health geeks even curse the sweetness in fruits. But sometimes an extra dose of fruit is not going to do us much harm.

INGREDIANTS: (Serve 4)

  1. Mango – 2 big size.
  2. Apple – 1 big size.
  3. Chia seeds- 3 tablespoon.
  4. Tapioca Pearls- 1/2 cup.
  5. Coconut Milk – 200 Ml
  6. Water – 200 Ml
  7. Chopped Nuts – Pistachios, Cashew, Almonds and Walnuts for the garnish.

HOW TO GO ABOUT IT:

  1. Chop the apples into small cubes. Soak them in little water keep them aside.
  2. Soak tapioca Pearls in 200 Ml coconut water for an hour or till the Pearls are completely soft and mushy. You may add water to the coconut milk in case you need more liquid to soaking.
  3. Soak chia seeds in water just enough to cover the seeds. In about 10 minutes you will see that the seeds have risen and are soft for consumption .
  4. Peel the mangoes and discard the seeds. Run the pulp in a blender till its runny and silky smooth. The puree is the final layer of the pudding.
  5. In a small glass or bowl, first add the chia seeds, then layer it with tapioca Pearls, the chopped apples and then layer it with mango puree. Repeat this till everything is finished and 4 glasses/bowls are yielded out of the ingrediants prepared.
  6. Pop them into the refrigerator and allow them to rest there for about an hour or till they are chilled.
  7. Top them with the chopped nuts and serve cold.

The dessert can be a bright breakfast idea too. I have many a times skipped the oats, dahlia or couscous breakfast and replaced with this pudding. One can make tremendous variations by adding Greek yogurt or more chopped fruits etc. The sky is the limit for people who innovate.

Happy Eating and Happy Cooking.

Thandai……our very own Indian MilkShake.

Thandai is the quintessential North Indian Milk based drink that is predominant in every Holi and Shivratri festival menus. Thandai is an exotic mix of spices like pepper, saffron, fennel, cardamom etc and nuts like almonds , melon seeds, cashews etc are combined together to make this energy drink. This refreshing beverage is not not tasty but power packed energy rebooster in every sense of the word.

Variations are tremendous and flavors are infused. Kesar Thandai, Mango Thandai, Kaju Badam Thandai etc are a few to name. Bhaang (Cannabis) Thandai is another very popular and lip smacking variety of thandai and this one is very popular during festival times in India.

a refreshing glass of Thandai makes the day worth it.

I like my Thandai mildly intoxicated and use a generous help of Poppy seeds and a few leaves of Dried Cannabis. While reading the whole article on this particular Thandai, one will have a fair idea of how it is done and finally the revelation of how simple this is to make.

THANDAI.

Now after much spoken about this delicious milkshake, let us see how it is made. It’s easy and it is no rocket science.

Yields 6 glasses of Thandai.

INGREDIENTS:

  1. Milk- 1 litres.
  2. Sugar- 1 cup.
  3. Fennel Seeds- 1.5 teaspoon
  4. Pepper corn- 2 teaspoon
  5. Melon seeds- 1 teaspoon
  6. Poppy seeds- 1.5 teaspoon.
  7. Almonds- one handful.
  8. Cashew nuts- 20 gms.
  9. Saffron – A few strands.
  10. Dried Rose Petals – 1 teaspoon.
  11. Cardamom- a few pods.

HOW TO GO ABOUT IT:

1.In a mixer grinder, add all the spices and nuts mentioned above along with the sugar.

2. Run the grinder to make it into a fine power and here your thandai powder is ready. Remove and keep the power ingredient aside

3. Now take the milk (I use the pasteurized tetra packed) into a large mixing bowl.

4. Add the thandai powder that we made sometime back by grinding all the spices and nuts into the milk.

5. Whisk them all together to incorporate, either using a whisk or run it all together in a blender. Either way, the aim is to incorporate everything with the milk.

6. Chill the finished product and serve by garnishing with some dry rose petals or some chopped nuts, saffron strands etc.

This energy beverage is best consumed chilled and fresh, however if kept refrigerated it can last for a day or two. Serve chilled and enjoy the good times with family and friends.

Cheers.

Withstanding the Test of Time- Assamese Cuisine THEN & NOW (Published Article)

Assamese Cuisine is a vast subject and definitely an unending one if we start talking about it. Arguably we have never tried to document such a beautiful cuisine defined by its Tribal and Non-Tribal component, as belligerently as our other counterparts. And with the transition of time, transformation taking over traditional kitchens have to a huge extent changed the perspective of traditional cooking and eating as well. I always believe that we as human civilization should not be stuck in realms of our dusty past, but also carry with us our age-old tradition, our ancient food and methods of cooking towards modernization and that is when I became an advocate of The Art of Slow Cooking. The reason why we are discussing today about our old forgotten cooking techniques and recipes that were once a common sight in our grandmothers’ kitchens are dying a slow death, some have succumbed to the fate of time and some are on the verge of it. If we just stand and look back, we can see that what is authentic, we have long past left them all behind. And the challenge is to restore them, understand and encourage to practice them in our modern kitchens irrespective of how far we have come out of this. The whole picture is bigger and in-depth knowledge is required as far as our ingredients, cooking utensils, techniques etc. are concerned and a balance in it all will ensure our understanding to this cuisine.

Our ingredients are highly medicinal and mother nature has cure for almost everything we suffer from in form of food. How we eat and cook them are mentioned now in folklores and guarded by remote villages of Assam. It is our responsibility now to go and find these recipes and learn them and rebuild a culture to learn and also most importantly to document the lost recipes for our next generation.

The question that keeps coming to me, is what possibly be the reason why the recipes that were once the pride of our grand mom’s kitchens are now lost in the transition and sadly not many of them are known to us anymore. Some of us may not even know about an array of ingredients which grow in abundance in our backyards, our balconies, sidewalks etc. and we ignore them as any other wild foliage and garden weed. But, if we reflect at this picture, it is not just sad and depressing, it is also very undermining that we have become puppets in a world where Factory Food and Processed Meals are order of the day. Where did all the goodness, pure form of cooking and recipes got lost? Is it just because we have switched to modern kitchens and eating modern meals? I see this as a big gap that was created because we couldn’t keep pace with slow cooking techniques and availability of global ingredient and equipment that gave us a very tasty meal with almost no effort on one hand and our traditional cooking is time consuming, elaborate and the yield is what is described as ‘NOT TASTY’.

The small things that were once a gift from mother nature, has been replaced by plastic and we kept contaminating our kitchens, our food and our environment and we only thought of convenience and never thought as in what could be the bigger picture that our elders wanted us to see and understand. Pressure cookers, Microwave Oven, Cook Tops etc. have definitely eased our effort and cooking became easier but the question remains, at the cost of the correct cooking techniques, are we cooking right? And most importantly feeding and eating right?

We have indeed come a long way and forgotten the old recipes that are basically remedies to various ailments etc. and on one hand many of us opine that we do not have many options for desserts, I came across a forgotten recipe called Lau Palla, a delicious, succulent sweet dish that I had for the first time in Nalbari and just fell in love with the flavours. It is made with Grated Bottle Gourd, rice flower, shaped into dumplings and shallow fried and then dipped in a jaggery sauce, served cold, during the onset of summer season, when the sun is blazing hot and humidity is scaling up. It acted as a natural coolant. But now we have switched to store brought ice creams and cold drinks to keep ourselves cool. Since this recipe is now getting lost, it is our responsibility to keep making this dish and revive its past glory.  Let us now see how to make this easy recipe and flaunt this in our dining tables.

Our state has blessed us with magical vegetables, plants and herbs that are delicious and also medicinal. We need to look back and understand why our forefathers consumed them and how they prepared them. Let us all try our best to document these eating habits that is typical to this region for the other generations to come and leave them a legacy of what to eat, when to eat and how to eat.

Atte Ka Halwa ( Whole Wheat Pudding)

A lot has been already written about Halwa and the variety of Halwas that we Indians prepare in our kitchens. This type of pudding are a quick fix to our sweet cravings and though some of the halwa recipes are definitely tough to get it right the first time, but this one particular recipe I think is one of those simple recipes with minimal ingredients and that are always available in our kitchens. I love simple recipes, that are minimalist and are non complicated and something that I can whip up in a matter of time. To me this is one such Halwa that is 100% not rocket science.

The first time I have had this Halwa was at Golden Temple, in Amritsar, Punjab during my maiden visit to the state of Punjab and I have visited the place thrice after that and till now,I crave for the Khada Prasad (Gurudwara Prasad) every once a while. So, it was the other day, I had some free time and lounging at home gave me a sweet craving. I thought of making this Halwa and rushed to the kitchen. Sugar, Whole Wheat, Ghee, Water and some nuts are all you need for this recipe.

Atte Ka Halwa.

The ingrediants required for this Halwa is mentioned below and that is the exact proportion I have used to make this dessert.

INGREDIANTS:

  1. Two cups of Atta (whole wheat)
  2. one and a half cups sugar (lessen the quantity if you are not a sweet person)
  3. There Cups of Water.
  4. Two cups of Ghee or Clarified Butter. (save some for the final drizzle)
  5. Chopped nuts (pistachios, almonds, cashews and a few dry rose petals for garnish)

HOW TO GO ABOUT IT:

STEP 1: Boil the water and add the sugar into it, keep stirring till the sugar dissolves. Keep it aside and allow it to cool down.

STEP 2 : In a non stick pan, over medium flame, add the ghee. As soon as the ghee melts, add the atta (whole wheat) and stir it immediately without halting. It may result into lumps and we do not want that for our halwa.

STEP 4: Regular stirring for over 8 minutes is recommended and in this process the atta also gets a beautiful colour and it ensures a flavourful texture of the halwa.

STEP 5: once the golden colour is ensured after stirring continuously, add the sugar syrup that we had prepared in Step 1. As we add the sugar syrup, we also need to stir continuously.

STEP 6: The halwa at this stage will begin to look like halwa as the atta will begin to absorb the water and a thick consistency is achieved. Now you can here check the sweetness and also add the chopped buts except of the rose petals.

STEP 7: The halwa is not done and all we need is to serve it. Some prefer halwas hot and some cold and chilled. I prefer a little warm. Before transferring it to a serving dish, add some ghee on top of it and garnish it with some dry rose petals.

Serve Immediately.

HAPPY COOKING 🙂

Fam Jam Fan ( cherry and java plum jam)

A super easy, few steps to sure shot yummy home made jam using two varieties of plum.

Don’t we just love jams? Well in my family we all do. The kids, the husband and me are all jam fans.  We love our seasonal fruits too and growing up and living in this part of the country we have seen mother nature blessing us with everything in abundance.

Summer season here is characterized by humid days and rainfall at the same time. The weather is just perfect for fruits and varieties of Plums are in prime. And here today in this post we will talk about  Cherry Plum and Java Plum or Jamun and how I have turned these fruits into delicious jam, that came home, some as gifts and some that I purchased from local markets. The boys in the family jumped to eat some but soon they got tired and eventually a lot was left and it broke my heart to see them lie unattended for a few days and then I buckled up to bottle them into jams.

Cherry Plum
Pic Sourced from the Internet

The Cherry Plum or Alubukhara is a sweet fruit with flesh and a small seed inside. The texture of the fruit is meaty and it has a beautiful aroma of it’s own. I have seen these trees in my home town in Dibrugarh where the branches are laddened with plums and as they get ripe, we would get busy to pluck them and collect them for various purposes. Making juice and jam out of it were summer afternoon favorites of our house helps.

Okay now let us begin and understand how simple this recipe is and after reading the process, I am sure you will too ditch store brought jam and start making your own. And just like my other recipes too, this one is also no rocket science.

INGREDIANTS:

1. Cherry Plum: 250 gma (washed, stalk removed and patted dry).

2. Sugar: 150 gms (a tad bit more if your fruit is on the sour side).

HOW TO GO ABOUT IT :

1. Cut the fruit keeping the peel intact, into small pieces. Discard the seeds.

2. Put in the sugar with the peeled fruit and give everything a good mix.

3. Over low flame, put a non stick pan and allow it to heat up. As the pan heats up, add the fruit and sugar mix.


4. Stir till the time you see the fruit releasing the water. Keep stirring over the low flame.

5. Gradually you will notice that the fruit has become soft, mushy and melting along with the sugar, leaving a jammy  texture.

6. Check the stickiness using your fingers and as soon as everything becomes incorporated, remove it from flame. It requires to sit down and cool completely.

7. Fill them in sterilize glass containers. Put them in the refrigerator and take it out when  you want to consume.

8. Shelf life in the refrigerator is over 3 months and trust me, it is so tasty that it doesn’t last long.

Plum Jam
The Bottled Beauty


So when this jam became an instant hit, I was so motivated to try another plum jam and on my daily green shopping, I saw a vendor selling some really dark, plump, juicy and intense coloured Java Plum. I knew the health benefits of the fruit and also the fact that the boys in the family did not enjoy the fruit much, yet I bought some home and turned them into jam. I also kept a small batch of the Jamun to try out something else, which I will discuss and share the recipe in the following posts of come up in the blog.

Jamun or Java Plum
The fresh batch of java plum

I got them home and cleaned and washed them. After that I repeated the above process and made a very tasty jam and the family was eating it in disbelief that it was made of our good old Jamun.

Java Plum Jam
The colour is a riot.

These both varieties of Jam was well loved and I made a point to share with whoever wanted to try. There were no harmful preservatives used in the jam making process and hence I was more than happy to offer to little kids as well. The only debate I will have with myself was the use of sugar but sometimes I do too indulge.

These Jams are just two ingredients fix. One is the fruit pulp and the other is sugar. And by using both in a controlled temperature,  it can turn into super delicious Jam. The family loved it on their toasts and Indian flat breads like the paranthas and the lusi too. I loved it on top of my favorite crackers and enjoyed it thoroughly with my cup of tea.

Happy eating and Happy cooking.


World Heritage Cuisine Summit and Food Festival 2018, Amritsar

When the student is ready, the masters appear’ so goes the saying and how true it was for as the hours unfolded during the three days of The World Heritage Cuisine Summit and Food Festival 2018, Amritsar, where I cooked along with some amazing food heroes and heard the stalwarts speak about Heritage Cuisine. The Summit not only saw Masterchefs from over 40 countries but also our Regional Chefs who have been creating a huge food revolution with their art and flair.

FB_IMG_1540024229366

In my course of narration, a lot of names will come up who not only inspired me but also have influenced me to work more and more in the field of Heritage Cuisine. The energy there at the Summit in Quila Gobindgarh, Amritsar was beyond electrifying and the food gurus made sure that they create an impact to new chefs like me to the optimum. I will also speak about a few Chefs who not only are working in the field of hospitality but are also legends for me and I will speak about them in the section MY FOOD HEROS in due course of time.

20181019_183201
The joy of feeding

Now coming back to the experience, I had in presenting Assamese Heritage Food to everyone out there was phenomenal and cooking in front of luminaries was another high for me. Chef Manisha Bhasin, Chef Manjit Gill, Chef Parvinder Singh Bali and Chef Ajay Sood were relentless company and their presence right outside the kitchen was an exhilarating experience in total. The food tasting was a sight to see where world chefs and our regional chefs all came together to taste and visually experience Assam food.

20181019_183716
My Identity and my Heritage

The synthesis of all coming together in this amazing cultural amphitheatre was seeing History take its course. I came back enriched just by witnessing Master chefs at work and the maestros during the panel discussions, every moment was something that I could pack and carry back home to Assam and to my people here in the land of the Blue hills and the red River.

20181020_164209
The inspiration and the much needed pictures with them. Chef Madhu, Chef Manisha, Chef Ajay Sood and Rocky

After the wrap ups there were times when I would find myself listening to chefs about their food journey and the amazing feat that they have achieved was so exciting and that in no way I could not feel proud of the moment by merely sitting next to them. The stories of Chef Grecho Vittorio, Chef Chris Bason, Chef Gareth Johns, Chef Akshraj Jodha, Chef Vaibhab Bhargava, Chef Denny Gunawan are no less than any thriller movie to me. They came, they saw, they cooked and they conquered. I was in absolute awe when I met Chef Sanjay Thakur who holds the Guinness record of setting up the world’s highest restaurant under the name of Project Triyagyoni and for that he trained for months and with blessings from Chef Gill and Chef Soundarajan, who also was part of the team, created history. Another source of inspiration came from the very talented Chef Hareesh Padmanabhan, the Executive Bakery and Pastry Chef, Qatar Airways and a very talented photographer. To see the master chef at work, with such precision and skill, was taking baking to the next level.

20181020_164952
With the legend Chef Manjit Gill along with Masterchefs and Visitors trying Assamese Food

The travel stories of Chef Hareesh and Chef Jodha were mesmerizing and understanding how food travelled and transcended cultures and geographical boundaries to culminate into cuisines that we know of today.

20181015_180237
The Divine Blessings of Golden Temple

The Summit to sum up was not just a mere platform to showcase and talk of my cuisine, which is less known of, but also to understand Heritage Food and be proud of to be representing it in global showground that break cultural barriers, language and distance. Food brought us together under one roof, to celebrate one another and be a part of something that World has not seen before.

Lau’r Palla (a delicate sweet dish made in Lower Assam kitchens)

Lau, meaks Lauki or Bottle Gourd in Assam and this dish is a traditional sweet dish from regions like Nalbari and adjoining places in Lower Assam (Lower Banks of the River Brahmaputra).

I first had this right after my marriage in my in-laws native home in Nalbari District and me being from the Upper Banks or Upper Assam, this was relatively new and interesting. I must add here that the Husband loves it the way his grandmother made. The recipe has come down from her kitchen into my mother-in-law’s and then she showed me how to make it and I followed suit. I am glad that I did. These recipes which are now gradually losing relavence, still lives on in my semi modern kitchen in a city far away.

Let me tell you how this is made. Its basically three (3) ingrediants fix. Oil is used to shallow fry the pithas or dumplings and then is kept in a syrup made of jaggery heated up with a little water. This delicacy is usally eaten a little cold or the next day so that the jaggery syrup is completely incorporates inside the pithas.

Assamese Cusine has no distinct dessert as such apart from the payokh or kheer that can be served as a dessert, I make this during our lunch or dinner parties at home, hence tweaked a bit here and there. I use chopped dry coconut and some almonds while mixing the dough for the pithas.

The ingrediants- grated lau or lauki or bottle gourd, jaggery and rice flour .

Now that we know the basic requirements to prepare this dish, I can do down to the instructions part that will eventually result in the final dish.

1. Grated Lauki or Bottle Gourd or Lau – 1 cup. Sqeeze the water out of it and keep it aside.

2. Rice flour- 1/2 cup. I have used the rice flour of bora saaul or the local sticky rice which is excellent while making pithas.

3. 1/2 cup of chopped jaggery with little water added to make into a syrup consistency. Heat the liquid and allow the jaggery to melt. Now that the syrup is ready, keep it aside to cool down.

4. Oil for frying. I have seen that in earlier households mustard oil was used in shallow frying the pithas. I however use the white oil.

Step By Step Method:

1. Add the rice flour to the bowl of grated lauki or lau or bottle gourd. Using your hands give it a good mix.

2. Add the chopped dry coconut and almonds. I also add some cardamom powder at this stage. Mix them all togther till they form a dough, enough to give them shapes of pithas or tikkis.

3. Now, make the pithas in the regualr disc shape about 1/2 inches thick. This ensures even frying and cooking through of the pithas.

4. Heat oil in a nonstick pan, and as the pan heats up add the pithas and shallow fry them making sure that they are evenly fried and cooked through.

5. Once done with the frying, add these pithas or fried dumplings into the jaggery/gur syrup. Let them all rest for a few hours before it gets ready to be served.

I usually let it rest overnight and I am always satisfied with thr results. So you may do the same and savour these lost pithas of time back again in your own living rooms and surprise your family and loved ones.

All set to be served

Lau’r palla is a very simplr, rustic yet full of flavour dish and this one occupies a happy place in my heart is because of thr loving memories etched with this dish.

My father-in-law loved it and so did the husband and I remember both of them savouring bowls after bowls of this pitha over some amazing stories of his hay days in Lower Assam. This falls under the category of happy recipes because of these happy memories attached.

Ladies and Gentelman ‘the humble Lau r Palla’

Boiled Country Chicken with Vegetables.

Ours is a family who enjoys boiled and steamed food more often and its the constant demand from them that makes me cook country chicken in this form, which for me is apparantly tasty and one of the easiest, hassle free cooking.

It is a no oil dish and protein power packed, teamed with goodness of all the vegetables that I add in it. Squash, Beans, Tomatoes, Ginger and Garlic, Potatoes, chucnks of ash gourd too, not only adds flavour to the chicken but also makes this rather simple looking recipe very intense. My elder son loves it and so does the husband and now I add the stew from the chicken in my younger one’s Khichri every now and then and this makes me feel very happy and also relief that I am saved from extensive cooking for the day.

The big bowl of goodness and health goes a long way. Some steamed rice along with a fiery hot chutney is my all time favorite. You can choose to add bambooshoots to this chicken along with chillies if you are the chilli kind of a person.

The chicken is cleaned washed thoroughly, and add all the vegetables of your choice. I generally add Squash, tender squash leaves, Potatoes, Onions, giner and garlic crushed, sliced onions, tomatoes, bottle gourd etc. I hand tear coriander leaves, pound some culantro etc. Add salt and fresh pounded pepper and mix everything.

Since I am into slow cooking my food, I put the chicken and vegetables in a wok and cook everything over slow heat. Gradually the chicken will leave its own water and so will the vegetables and the chicken will be cooked. You can later add warm water to adjust the stew requirement. Cover it with a lid and keep stirring from time to time. Once your chicken is done, you can add some coriander leaves as garnish.

Another poular method is to pressure cook everything together. You can add about half cup water into the cooker and then add the chicken and vegetables. Pressure cook over medium flame for 3-4 whistles. Remove from flame and serve hot.

This is a very easy and healthy chicken recipe. You need very minimal ingrediants to whip up this rustic yet yummy chicken prepration.

Team it up with steamed rice and some butter or fresh baked dinner rolls, this chicken recipe for sure won’t disappoint you.

Enjoy.

Squid Masala Fry

We are a family of fish lovers and my love for fresh water fish is as deep as my love for sea food.

I was exposed to sea food eating when I was a little girl and from tinned tuna to fresh octopus were a delight for me. Gradually when I started cooking, I began to explore more of Sea food. Another reason for this deep liking is because we are far from seas and its a rare ocassion we get to cook a beautiful fresh salmon or a lobster. So the raritiy became a huge liking when it comes to eating especially when I get to cook it.

Last week we had a few friends home over drinks and food and I decided to make a masala fry for the packet of frozen squid that I got from the store as a starter. I kept it very simple and needless to say it turned out super hit amongst the guests.  The squid rings were cleaned and pre washed so it took care of the cleaning part. I gave a quick turmeric powder added to water wash and it was all ready to be cooked. Its how I did it.

1. 250 gms squid rings, washed with turmeric water and then water drained out properly.

2. Add salt to taste, red chilli powder for colour and heat as well. To this I added coriander and cumin powder and some peanut powder as well. I sprinkled some garlic powder and a pinch of garam masala. Give it a mix and let it stand for about an hour or two.

3. In a wok, add white oil and allow it to heat. Take a bunch of curry leaves and fry them crisp. Keep the leaves aside.

4. In the same wok, add oil if required. As the oil heats up , add the squid mixed with spices. Fry them in medium heat for not more then 3 minutes.

5. Transfer the squid fries into a platter and top it with the fried curry leaves. Give a good squeeze of lemon and its all set to be served.

This came out as a wonderful starter and though I am not a fan of frozen food, this can be my saviour at times.

Tips: To avoid the squid from becoming rubbery and chewy, do not over cook.

Bird’s Eye Chilli Pickle. ( Kon Jolokia Asar)

Are you making your Pickles yet??

Winter season in Assam is not only beautiful but its bountiful too of amazing vegetable and fruit produces. Not only our appetitie is at its best, thr availability of nature’s goodness is at peak as well. We just recover from the harsh summer floods to good weather and greens flooding the market and our vegetable patches, its time to pickle and there is no exception at our home as well. I have already pickled ‘The Indian Olives or Jolphai in Assamess, the recipe I will discuss later in the week, but now let’s see how my favorite chillies, the bird’s eye chillies are pickled.

1. Clean and remove the stalk from the chillies.
2. I have used about 400 gms chillies and about 100 gms of garlic.
3. Sun dry them for the day to lose enough moisture from them.
4. Now, for the pickle masala I have used.
1 tablespoon of whole coriander seeds
1 tablespoon of cumin seeds
1/2 teaspoon methi seeds
1/2 teaspoon of black mustard seeds.
2-3 whole dry red chillies.
Salt as per taste.

The above mentioned ingrediants are then dry roasted till they release their full flavour. Allow them to cool down completely.
Grind them coarse after adding 2 tablespoon of vinegar and 1 tablespoon of lemon juice.

Mix the masala into the chillies and allow it to stand for sometime.

Now in a kadhai, heat mustard oil, I have used about 450 ML, enough to keep the chillies soaked. As the oil reaches smoking point switch off the gas and allow it to cool completely.

Add the chillies mixed with the masalas into the mustard oil and give a gentle mix.

Fill them up in a clean, sterile glass jar and cover the lid. Keep placing the pickle jar in the sun for about 4-5 days. You pickle is all ready consumption.